How to Do an SEO Audit: A 16-Step Checklist


Hand off the toughest tasks in SEO, PPC, and content without compromising quality
Explore ServicesYou’re already hustling to keep your site in top shape. Smart move.
Smarter still? Running an SEO audit to catch any weak spots before they bite.
Here are 16 steps to SEO audit mastery 👇
1. Crawl Your Site
You can’t fix what you don’t see, so crawling your site is the first step in this SEO audit. Tools like Screaming Frog or Ahref’s Site Audit tool are where you’ll want to turn. They’ll crawl a site and sniff out broken links, redirects, and orphaned pages that are tanking its potential.
Which tool is best for you? Screaming Frog hits hard. It’s fast and free up to 500 URLs, though it’ll involve a slight learning curve if you haven’t used it before. Sitebulb’s the slicker pick if you want pretty visuals without drowning in geek speak. Same job, less headache, and a 14-day trial.
For this example, I’ll use Screaming Frog. Here’s how:
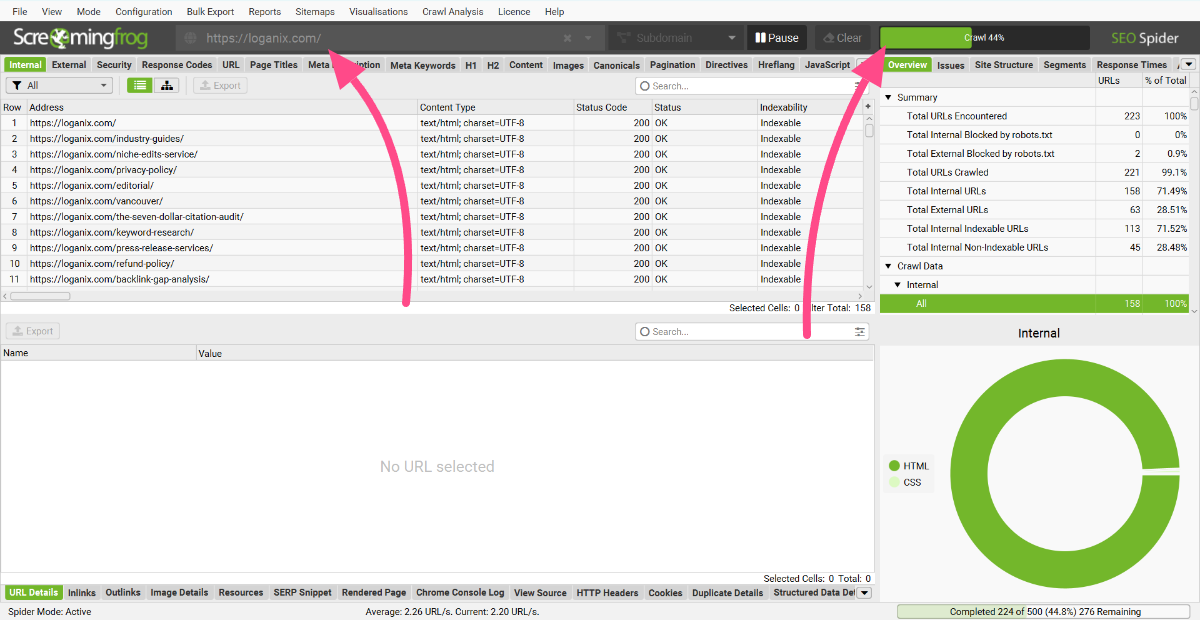
- Head to the Screaming Frog download page (I’ve linked to it above) and install the software. Once you’re done, open the application, plug in the site’s URL, and hit Start. On the top right of the screen, you’ll notice a progress bar displaying how much of the site Screaming Frog has crawled. FYI: large sites can take hours to crawl. If you’re working on a site like this, I recommend running Screaming Frog overnight.

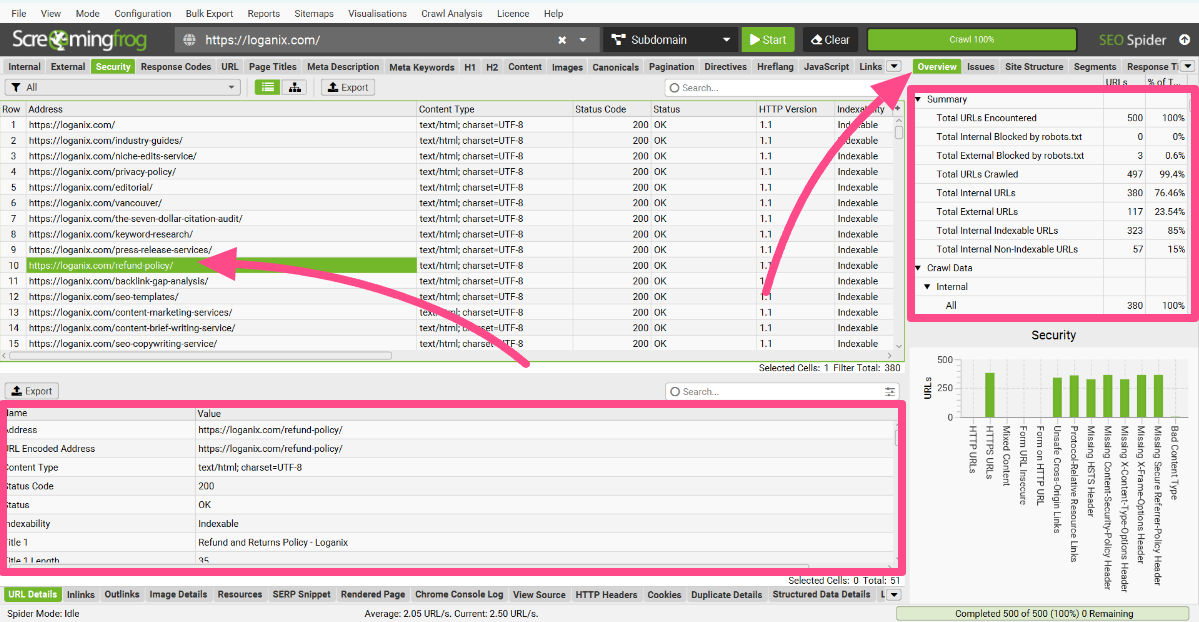
- Once the crawling is done, head over to the Overview tab. From response codes and security measures to page titles, here, you’ll have access to a whole bunch of different data. Clicking on any of the fields here will display the URLs in question in the main window, and clicking any of the URLs in the main window will expand even more data about the individual page.

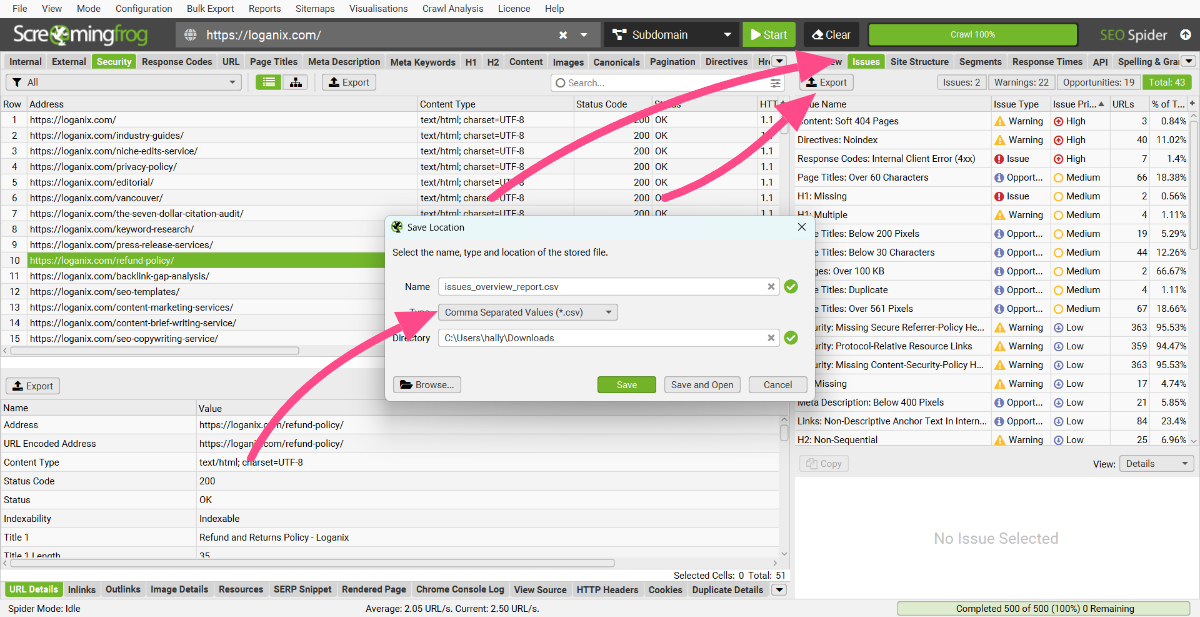
- So, what do you do with all this beautiful data? You can click on the Issues tab. Here are highlighted all the problems you’ll need to fix, which makes your job much easier because you don’t have to individually sort through every single URL to see if there are issues. The Issues tab even sorts the problems by priority, so you can work on the most critical ones and get back to the others later. From here, you can export the data into a CSV file or directly into Google Sheets. Once you’ve done that, you can take the insights, optimize the pages, fix the issues, and set them back on the right track.

2. Check Indexing
Indexing is when Google adds your page to its database, making it eligible to rank. No index, no dice—end of story. Lucky for you, Google Search Console (GSC) is here to spill the beans on what’s in, what’s out, and why.
Let’s cut through the noise and see what’s really happening.
- Log into GSC
If you’re not already set up, stop right now and get it done. No GSC, no answers, simple as that. - Navigate to “Pages” under “Indexing”
This is your command center. It shows what’s indexed and what’s been sidelined. - Dive into the “Why pages aren’t indexed” table
Here’s where the truth lives. This table lists every reason Google’s rejecting your pages, reasons like “Excluded by ‘noindex’ tag” or “Crawled – currently not indexed.” It’s your hit list of problems to fix.
Not sure what those terms mean? Here’s the breakdown:
- Excluded by ‘noindex’ tag
Someone—maybe you—slapped a ‘noindex’ tag on the page, telling Google to ignore it. Intentional for a login page? Fine. A mistake on a key page? Rip that tag out and request reindexing. - Crawled – currently not indexed
Google crawled it but decided it was not worth indexing. Thin content, duplicates, or low value could be the culprits. Pump up the quality or ditch it. - Discovered – currently not indexed
Google knows it’s there but hasn’t crawled it yet. It could be a crawl budget issue or a sign your page isn’t pulling its weight. Tighten up your site structure or prioritize better content.
Heads up: not every excluded page is a crisis. Admin pages or duplicates should stay out. But if your money-making pages are not indexed, it’s go time.
3. Analyze Site Speed
A slow site drives users away and drags your search engine rankings down with it. The goal? Get your load time under 3 seconds.
To know where you stand in terms of site speed, use Google PageSpeed Insights. It’s a free tool that analyzes your site’s performance on mobile and desktop. Here’s how to do it:
- https://pagespeed.web.dev/.
- Type in your URL and click “Analyze.”
- Check your results. You’ll get a score out of 100 and your load time on mobile and desktop.

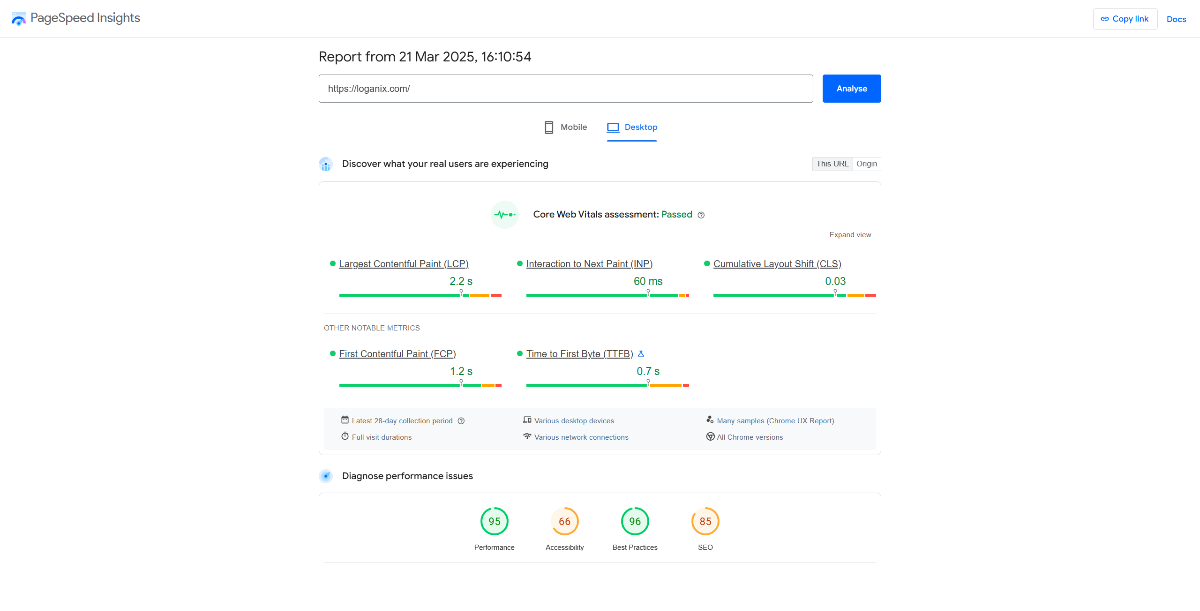
Your score is a guide, but the seconds matter more. The report also highlights:
- Largest Contentful Paint (LCP): When the main content loads (target: under 2.5 seconds).
- Interaction to Next Pain (INP): How quickly a page responds to user interactions (target: under 200 milliseconds).
- First Contentful Paint (FCP): When the first content appears (target: 1-2 seconds).
If your site’s lagging, try these:
- Compress Images: Use TinyPNG or ImageOptim to shrink file sizes without losing quality.
- Cut HTTP Requests: Reduce scripts, images, and plugins. The less to load, the faster it goes.
- Add Browser Caching: Store static files so returning visitors load faster.
- Try a CDN: Deliver your site from servers closer to your users.
Run PageSpeed Insights again after tweaks to see the difference.
4. Assess Mobile-Friendliness

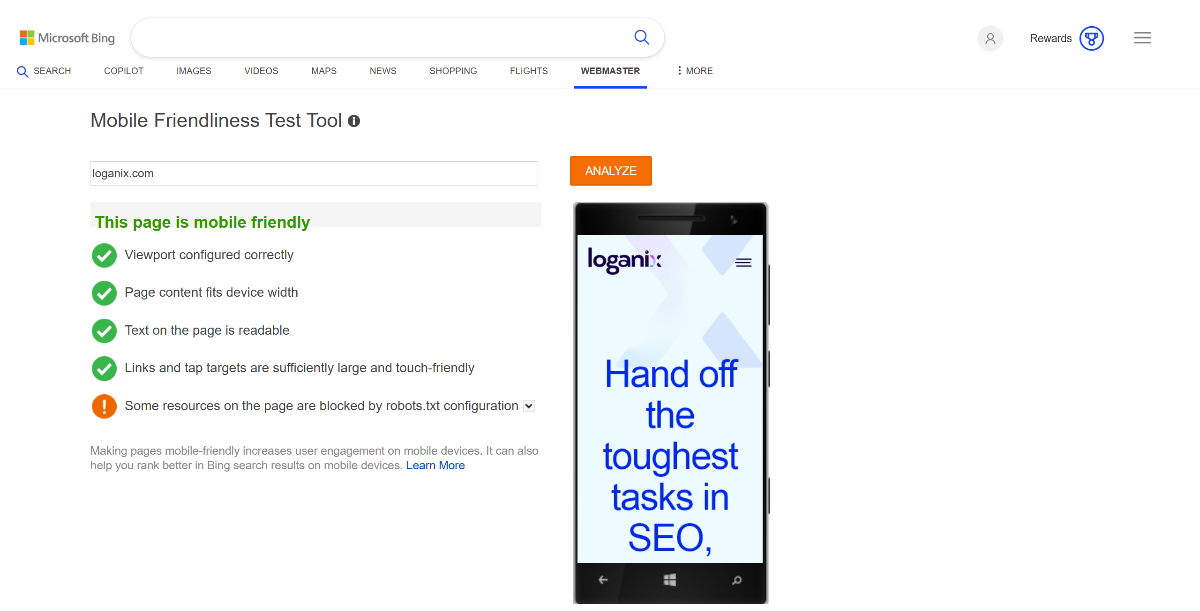
Google’s Mobile-Friendly Tool has been retired. But Bing has a mobile friendliness test that does the job just fine. It’s free, simple, and delivers actionable insights. Here’s how to use it:
- Head to the tool.
- Enter your site’s URL.
- Hit run, and within seconds, you’ll get a report.
The tool checks how well your site adapts to mobile screens and flags issues like:
- Layout Problems: Content that doesn’t scale properly, text that’s too small, or elements overlapping on smaller screens.
- Button Issues: Buttons that are too tiny or too close together make them tough to tap without errors.
- Navigation Troubles: Menus that are awkward to use on touch screens or hard to access with a thumb.
You’ll get a clear “pass” or “fail” verdict, plus specific recommendations if something’s off.
5. Verify SSL
SSL (Secure Sockets Layer) powers HTTPS, encrypting the connection between your site and its visitors. This keeps sensitive data, like login credentials or payment info, safe from prying eyes. Without it, or if your site mixes HTTPS with insecure HTTP resources (aka mixed content), browsers flag it as unsafe.
That’s a trust killer and a signal to Google to drop your rankings.
Follow these steps to verify your SSL setup and ensure no mixed content is sabotaging you:
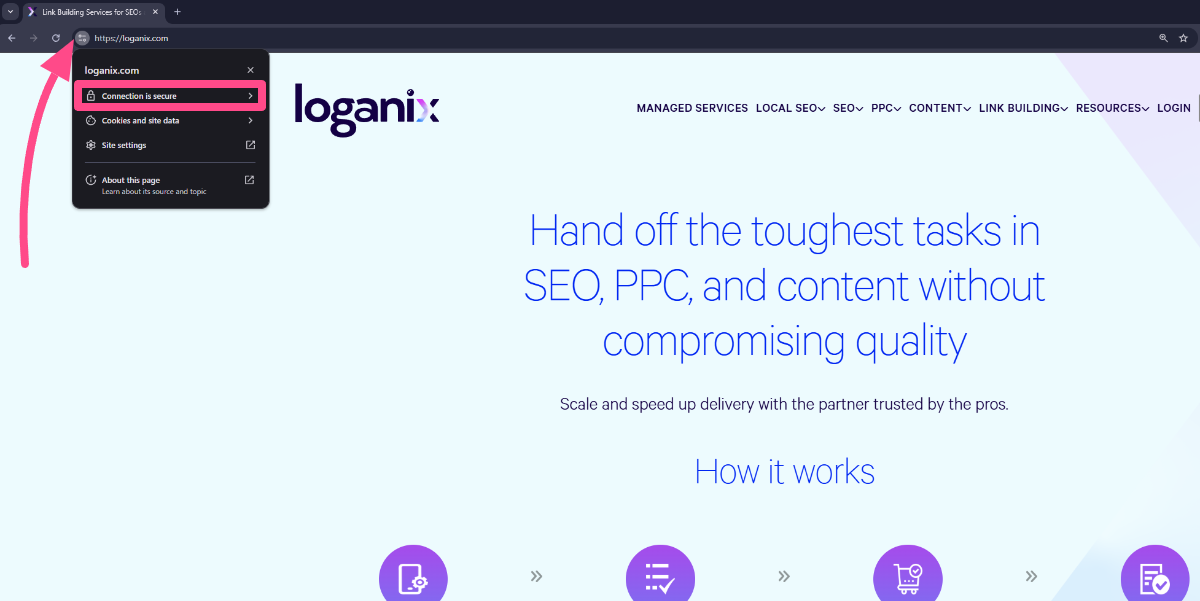
- Check the Padlock
Visit your site. Click on the menu button within the address bar. See a padlock? Good start. No padlock or a warning? Something’s broken, so keep digging.
- Run Online Tools
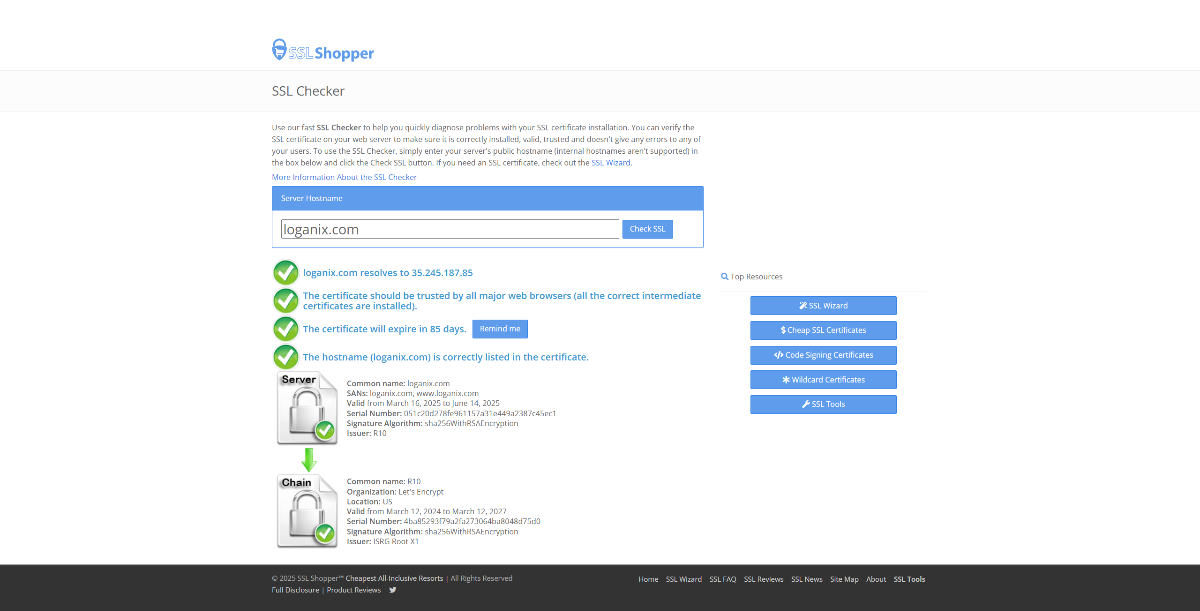
Use free tools like SSL Checker or Why No Padlock? to scan your site. They’ll flag SSL certificate issues, like expiration or improper installation, in minutes.

- Dive into Developer Tools
Open your browser’s developer tools (F12 or right-click > Inspect), go to the “Console” tab, and look for errors. Mixed content warnings will scream at you with messages like:
“Mixed Content: The page at ‘https://your-site.com/’ was loaded over HTTPS, but requested an insecure resource ‘http://your-site.com/image.jpg’.”
These mean some resources (images, scripts, etc.) are still loading over HTTP.
Lock it down, test it thoroughly, and keep it maintained. Your traffic (and sanity) will thank you.
6. Review Robots.txt
Your blog, your product pages, and your lead magnets, you want these seen. If robots.txt is blocking them, Google’s crawlers can’t touch them. No crawl, no index, no rankings, no traffic.
Here’s how to check your robots.txt in Google Search Console and fix any mess:

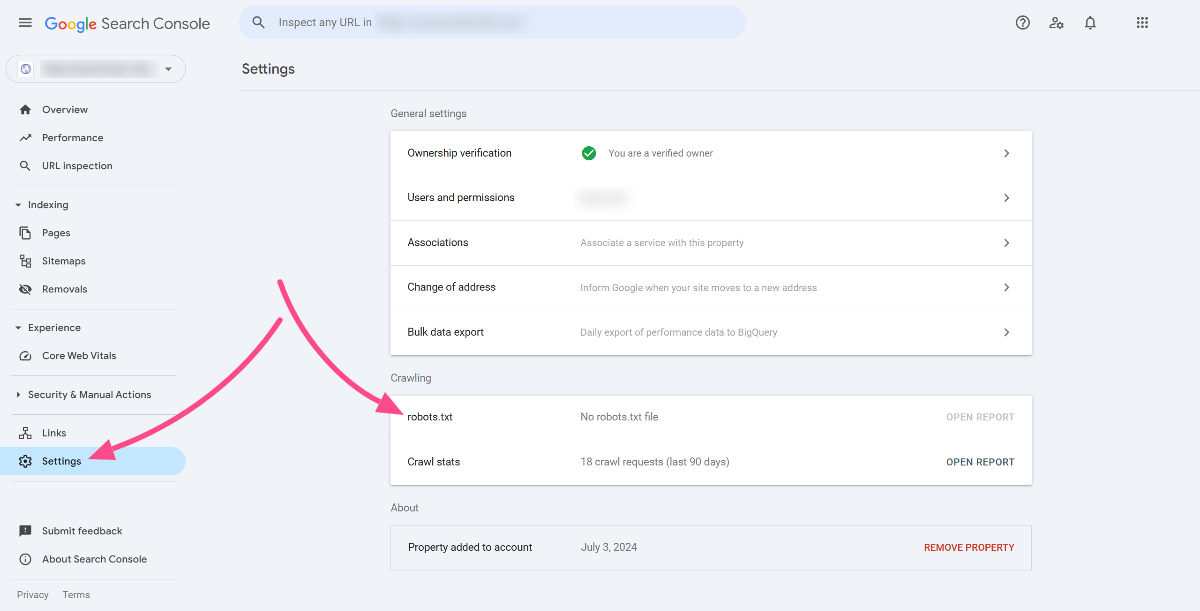
- Log into GSC. Just like we did earlier.
- Hit Settings > Robots.txt. This shows you the raw file, telling you what’s allowed and what’s blocked.
- Scan for ‘Disallow’ directives. Spot something like ‘Disallow: /blog/’ when your blog’s your cash cow? That’s a red flag waving in your face.
- Test it with the Robots.txt Tester. Punch in your key pages. If Googlebot’s getting a “Blocked” signal, unblock it fast.

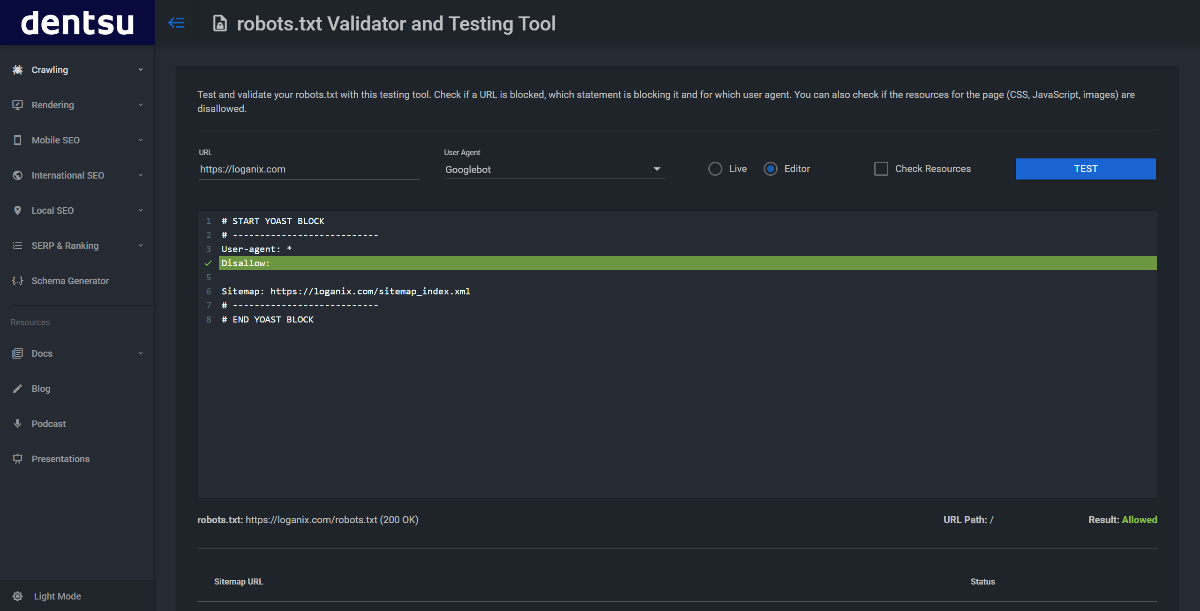
Dentsu’s robots.txt testing tool is great for this. Plug in the URL you suspect might be blocked by your robots.txt file, choose the user agent (Googlebot), run a quick test, and wait for Dentsu to do its thing.
7. Audit XML Sitemaps
Your XML sitemap is the map Google follows to crawl your site. Every page that you want indexed better be on it, or it won’t appear in search. Is Google missing your best stuff? Here’s how to fix it:
Jump into Google Search Console (GSC) and hit the Sitemaps report under “Indexing.”

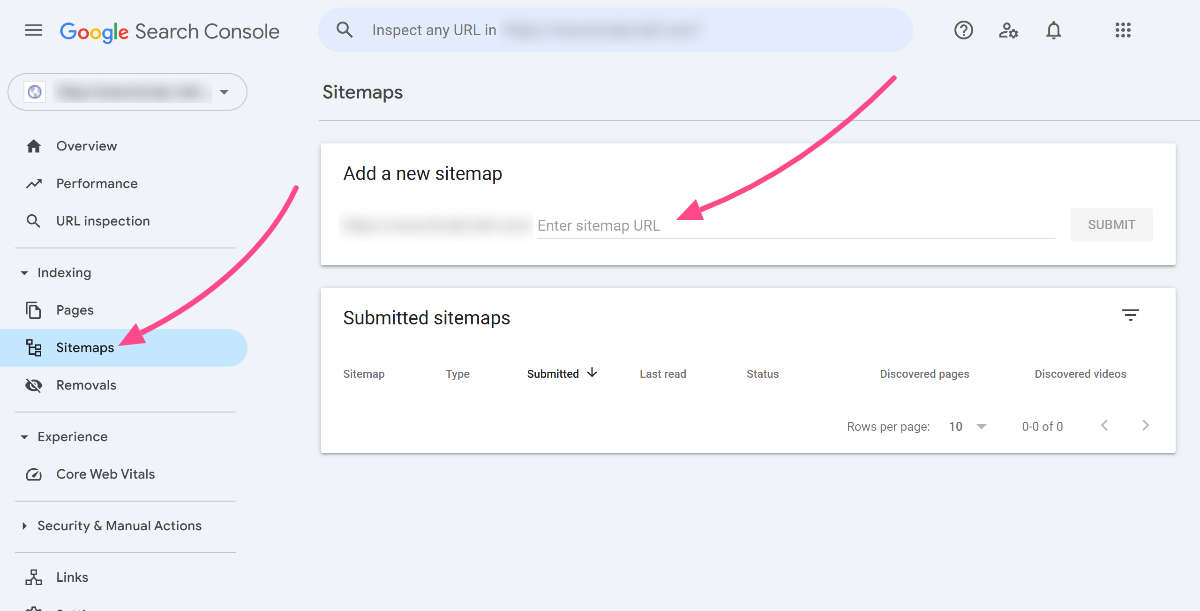
Log into Google Search Console (GSC) and hit the Sitemaps section under “Indexing.” Enter your sitemap URL—something like yoursite.com/sitemap.xml—in the “Add a new sitemap” field, then click Submit.
GSC will process it and show a status: “Success” means it’s clean; “Couldn’t fetch” or “Errors” means it’s busted. Click the sitemap entry to see the Crawled URLs count and any Errors—like invalid URLs or syntax issues—in the report.
Every page you want indexed needs to return a 200 OK status in that sitemap. Check it with GSC or run Screaming Frog to confirm; it’ll flag anything off.
Ditch the trash: admin pages, duplicate URLs, 404 errors—these suck up crawl budget and dilute your juice. If you’re anal about it, validate the XML against sitemaps.org rules to catch coding screw-ups Google hates.
8. Find Duplicate Content
Duplicate content on multiple pages confuses Google and potentially harms each page’s rankings. Thankfully, there’s a tool that’ll sniff out the mess: Siteliner.
Head to Siteliner, enter your site URL and run a free crawl up to 250 pages. It’ll list every duplicate URL and the exact content overlap percentage.

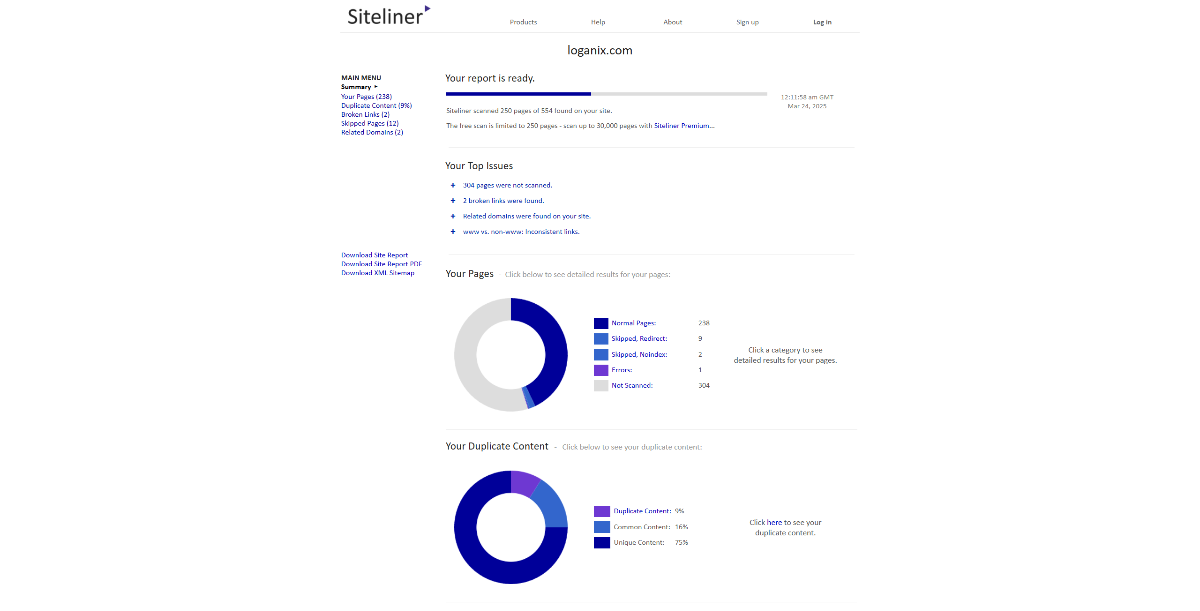
Click on the report to see the flagged pages. Then, delete the doppelgangers and 301 redirect them to one solid page or rewrite them so they’re unique.
9. Analyze On-Page Elements
Your on-page elements—titles, metas, headers—are the backbone of how Google reads your site, and if they’re sloppy, you’re bleeding clicks. Let’s rip into this and fix what’s broken:
Fire up Screaming Frog again, and if you need to, recrawl your site. Once it’s done, head back to the Issues tab. Here, Screaming Frog will call out any on-page issues that you need to fix, like duplicate H1s, meta descriptions that are too long, etc.
If you’re unsure how to fix something, just click on the issue, and in the Issue Details window, Screaming Frog will guide you through how to go about it.

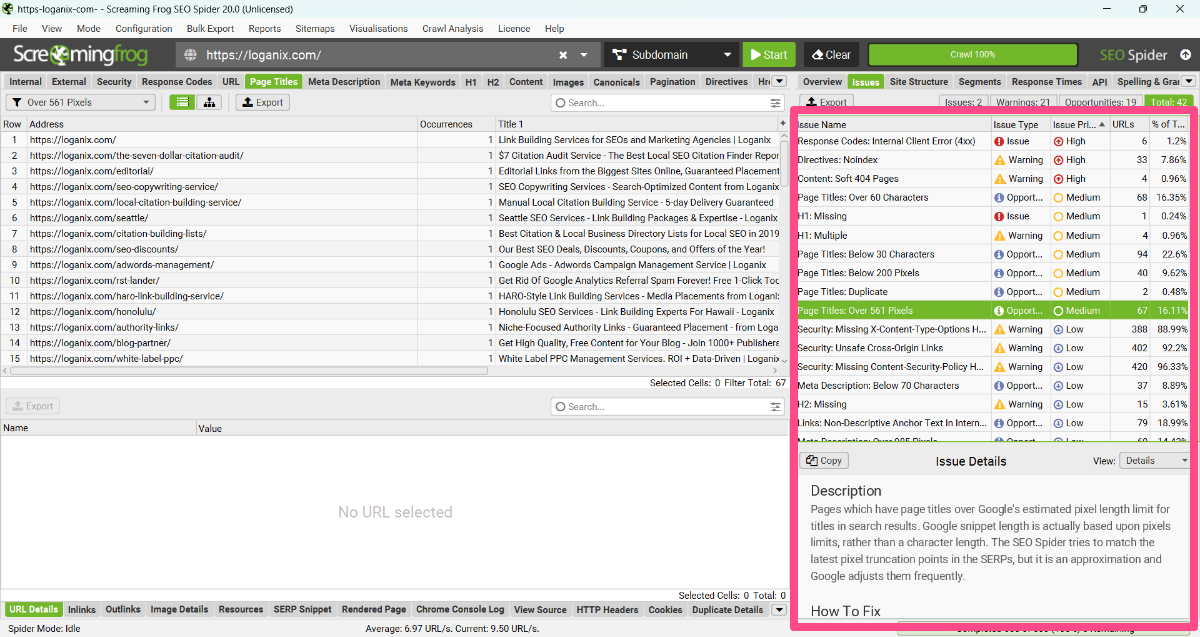
Run through the list, fix the higher-priority issues first, and relish the satisfaction of optimized on-page elements.
10. Evaluate Content Quality/Depth
Thin, shallow pages are SEO poison. Google’s not a fan, and users bounce faster than you can blink. Time to evaluate your word count and relevance, axe the weak stuff, and beef up what matters:
Crack open your site and check every page. Does it nail the topic or wander off into fluff? Run it through Clearscope, SurferSEO, or MarketMuse.

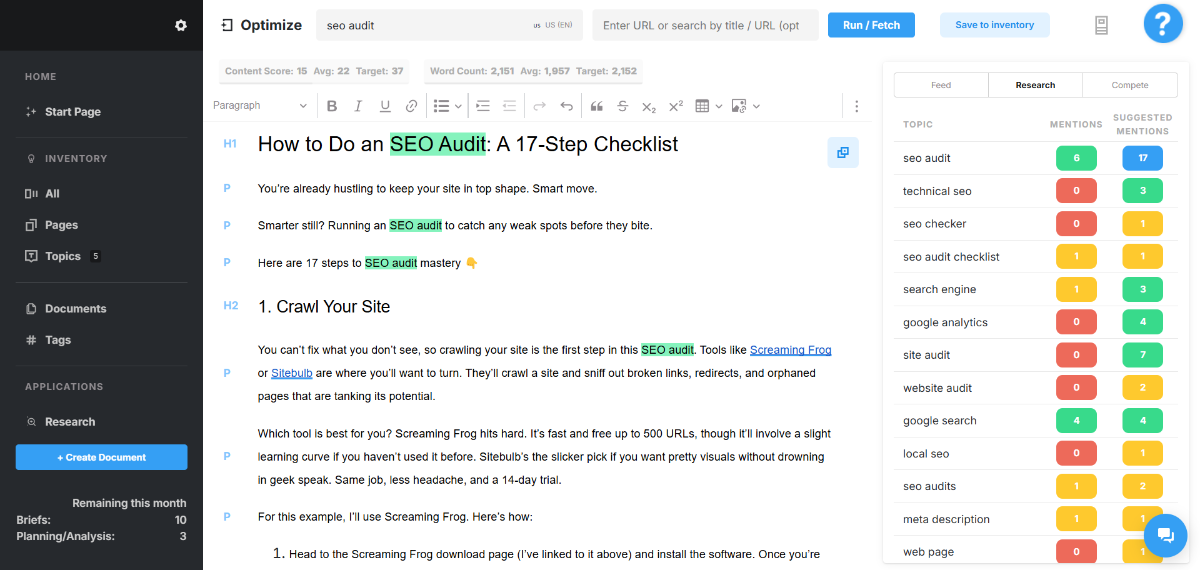
These tools will do the hard work for you, averaging out which terms are used by competitors, what word count Google is ranking, and which related terms you should be hitting. If it’s thin or off-base, get it up to scratch or delete it.
11. Check Internal Linking
Fire up Ahrefs, head to the Site Audit tool, punch in your domain and go to the Links report. It’s under Reports in the left-hand menu.

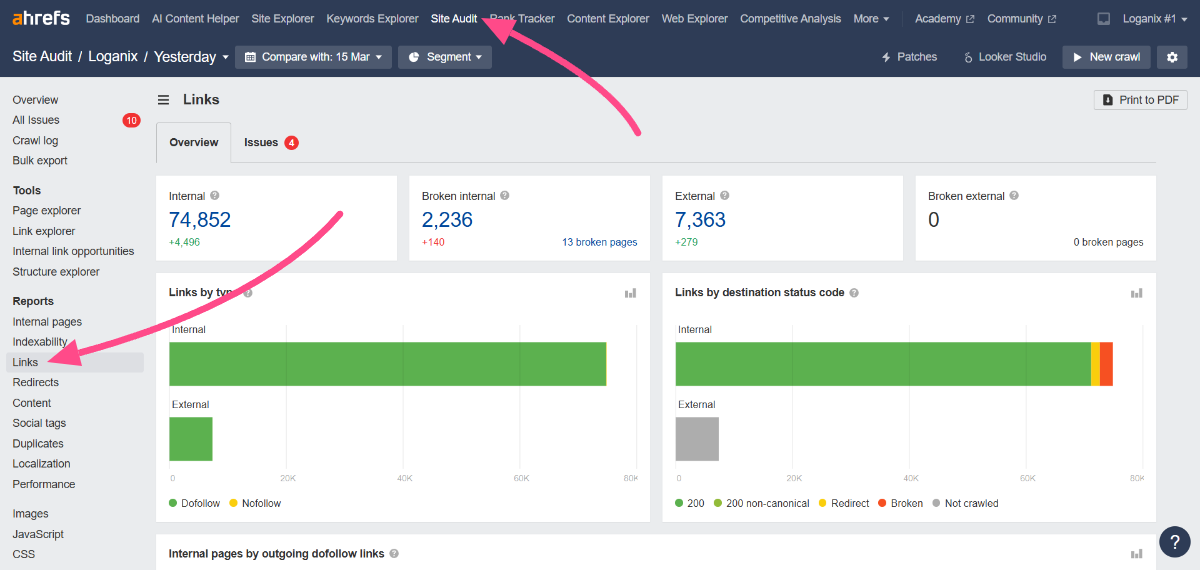
We want to focus on the Broken internal links here (it looks like we have some work to do in this department; 2,236 broken internal links won’t do!).

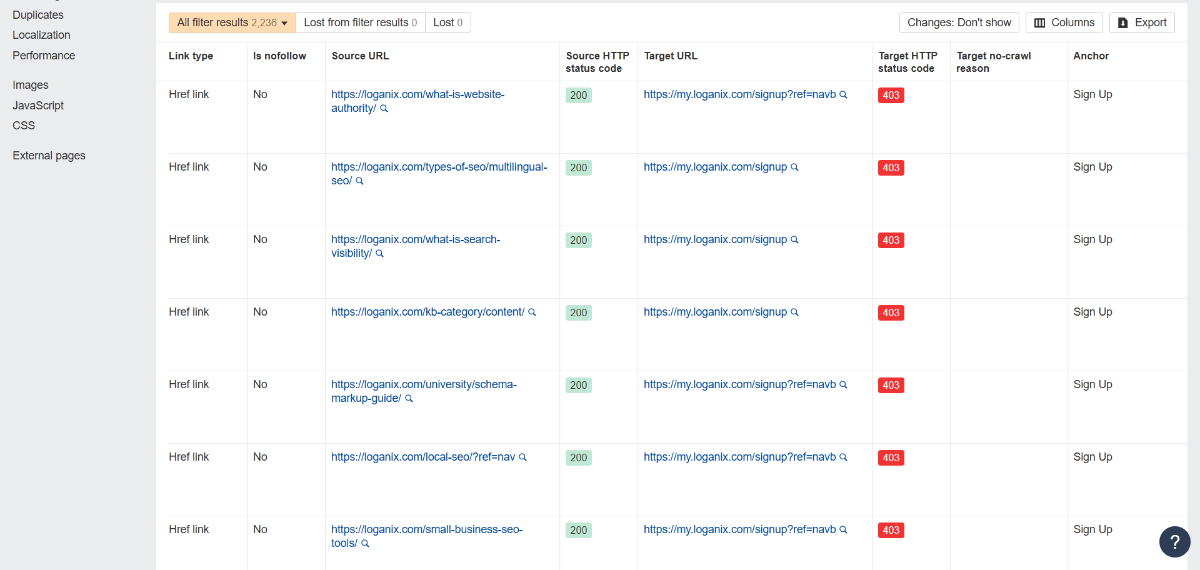
Click on the number, in our case 2,236. It’ll take you to a list of all your broken links, making it easy to identify them. Export the list and get to work fixing them.
12. Assess UX/Navigation
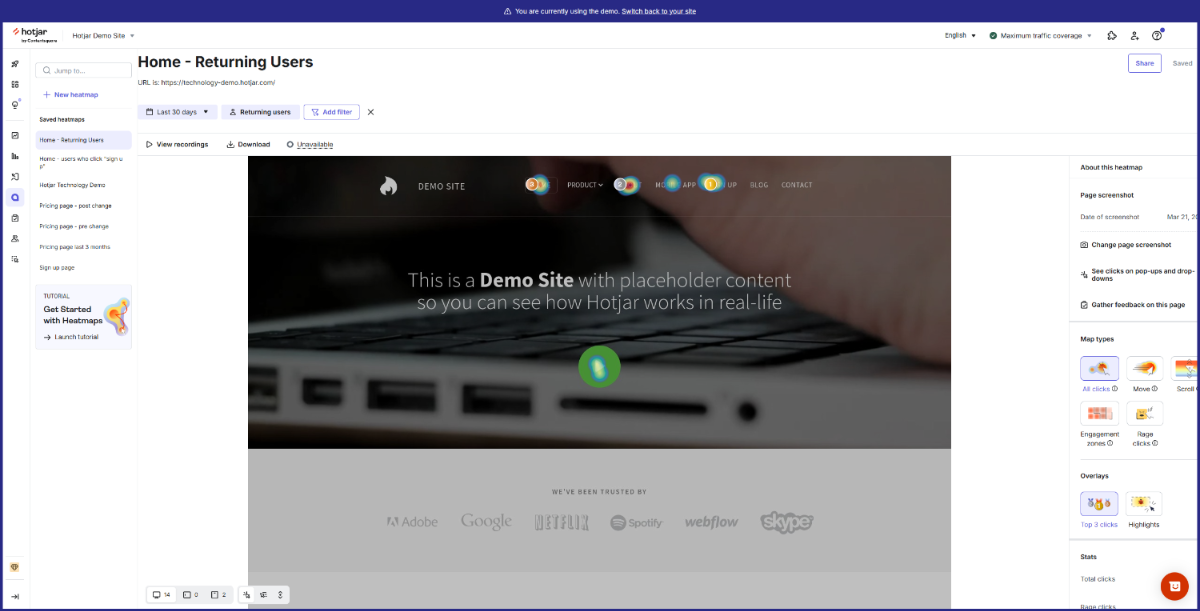
Grab an audit tool like Hotjar. Fire it up and run heatmaps on your key web pages, like a landing page. Hotjar tracks a whole bunch of user interactions with a page, including clicks and scrolls.

You should also test your navigation flow manually: start at your homepage and hit every menu link. Can you find your top content in 2-3 clicks? If you can’t, it’s time to do some restructuring. Then, eyeball your CTAs. Are “Buy Now” or “Get Started” buttons big, bold, and screaming action? No vague “Click Here.” Instead, make them clear or lose the sale.
The better the navigation, the smoother the user experience, and the more time on site, the more conversions.
13. Research Competitors
Fire up Ahrefs and plug your domain’s URL into the Competitive Analysis tool. Then, input your competitors. If you don’t know who they are, Ahrefs will suggest your closest competitors based on common keywords. Hit Show keyword opportunities.

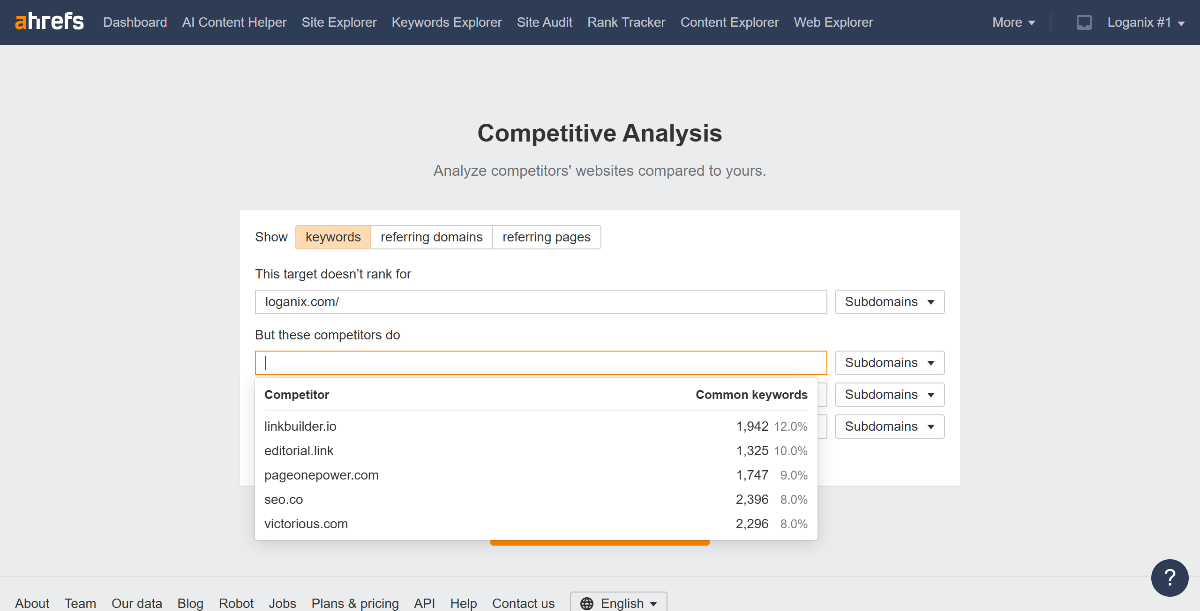
Ahrefs will now take you to the Content gap report, which shows you all the niche-relevant keywords your competitors are ranking for but you aren’t.

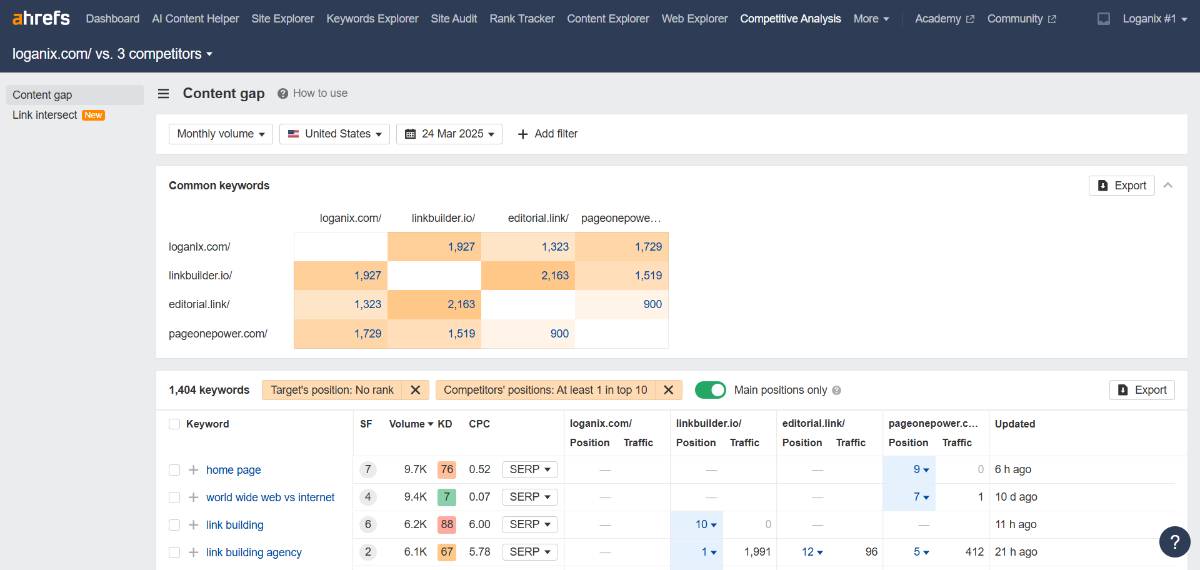
If you switch over to the Link intersect report, Ahrefs will show you all the domains or pages that are linking to your competitors but not you.

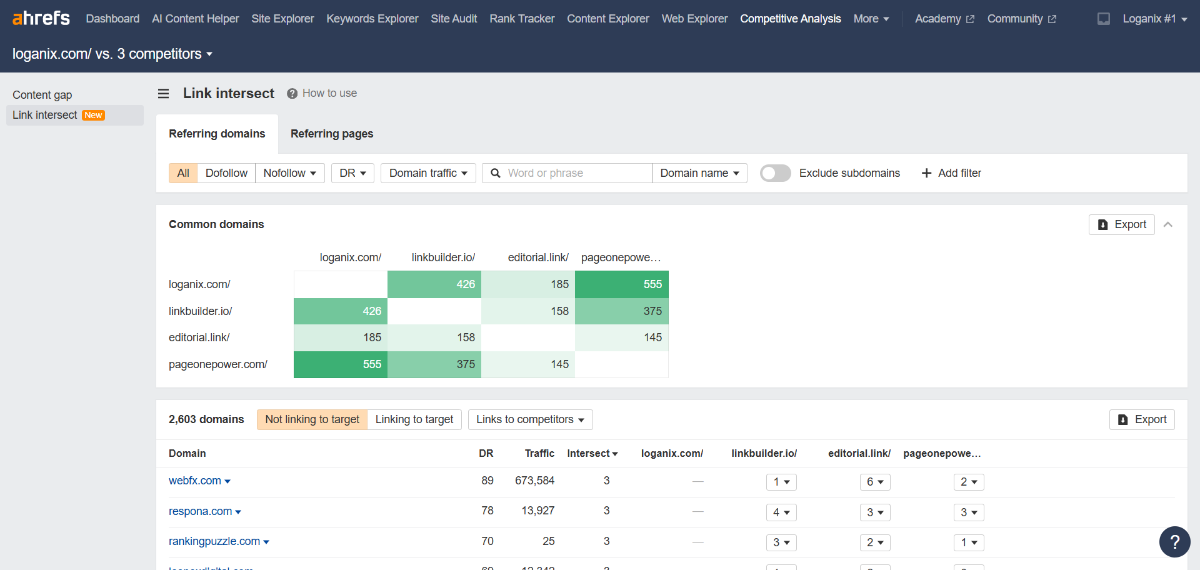
You can use these insights to identify websites that you can reach out to for link-building purposes. If they’re willing to link to your competitors, they may be open to linking to you, too.
14. Analyze Backlink Profile
Back to Ahrefs’s Site Explorer tool. Plug in your domain and head to the Backlinks report in the left-hand menu. Click it and sort by Domain Rating (DR) from high to low. High-DR links (50+) from legit sites pumping juice into your pages.

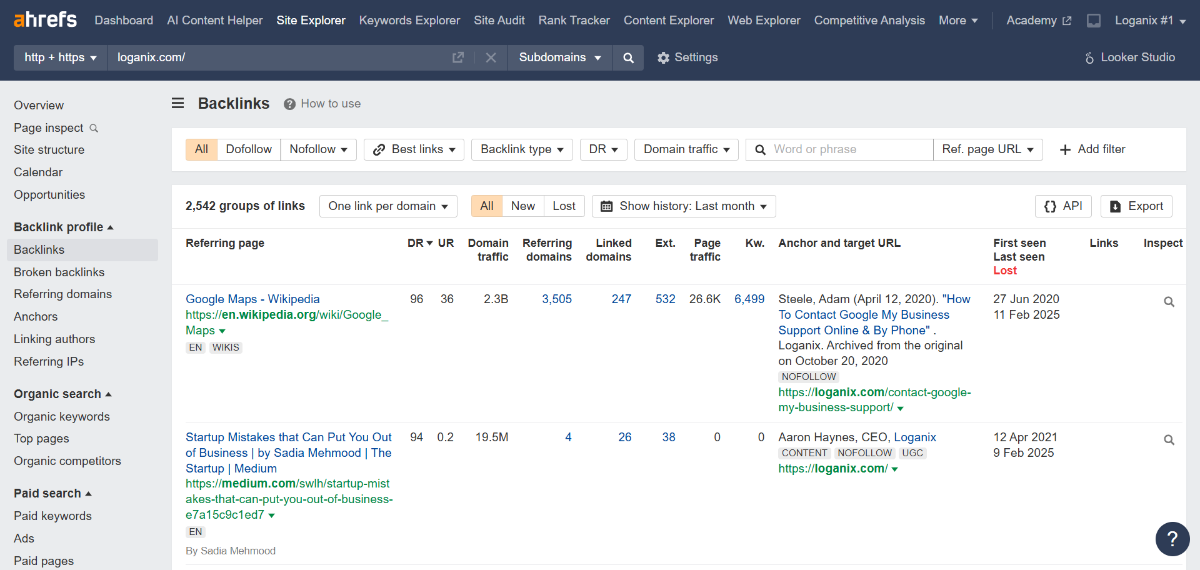
Now flip to Referring Domains and sort by Organic Traffic to see which domains send real clicks your way.

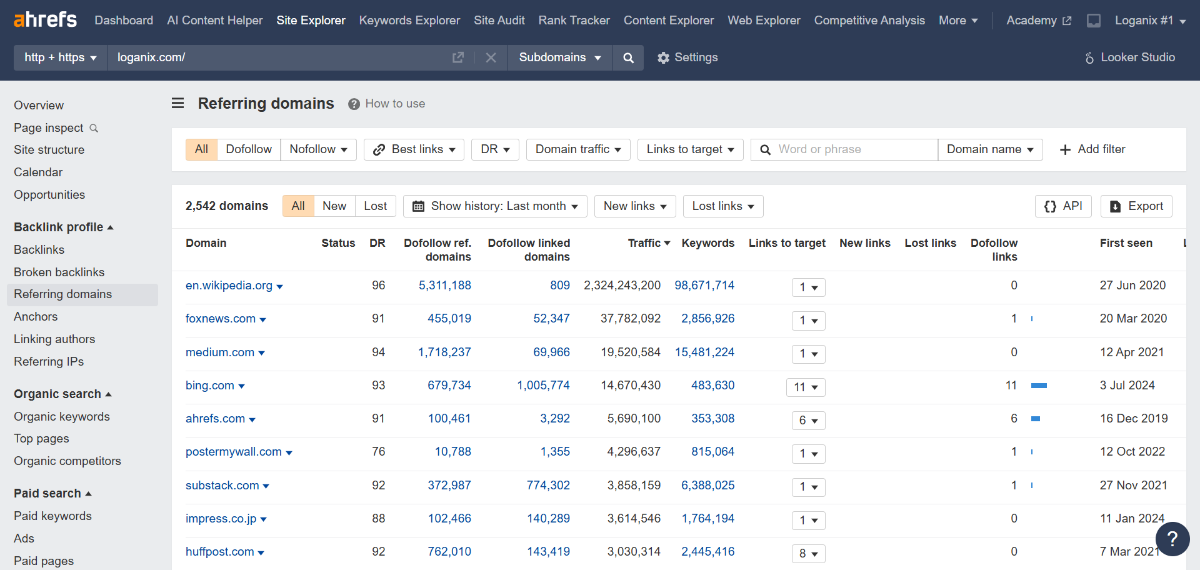
Low link count to key pages? Weak DR spread? That’s where you’re bleeding. Build high-quality links to these pages and get them ranking.
15. Monitor Organic Traffic
Don’t close the Site Explorer tool just yet. Click Overview and eyeball the Performance graph. Spikes mean your fixes are kicking butt; dips or a flat line mean algorithm hits, or something could use a fix or a tweak.

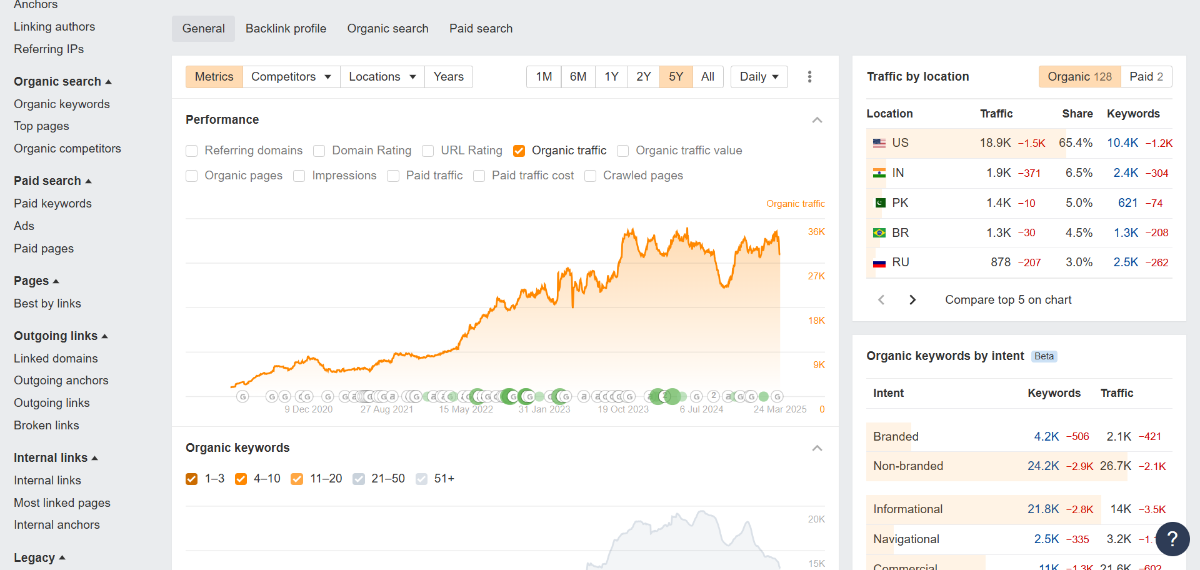
Some things to keep in mind:
- Spot Drops: Jump to the Top Pages report under Organic search. Then, sort by Change next to Traffic. Low traffic on key pages? That’s your culprit. Fix what’s tanking them.
- Track Wins: Same report, but sort by traffic gain. Pages spiking? That’s your SEO efforts paying. Double down on those tactics.
- Why It’s Flat: Hit Organic Keywords, filter “Position 1-10”. If traffic’s low despite high ranks, your keywords ain’t pulling weight. Chase better terms.
16. Track Rankings
Ahrefs also has a rank-tracking tool called Rank Tracker. If it’s your first rodeo, click “Add new project,” punch in your domain, and either use GSC or set up the new project manually.
Once you’re up and running, add the keywords you’d like to track, hit “Add,” and save it. Back in the Overview tab, eyeball the Performance and Positions graphs, and watch the line spike or sag. That’s your gut check.

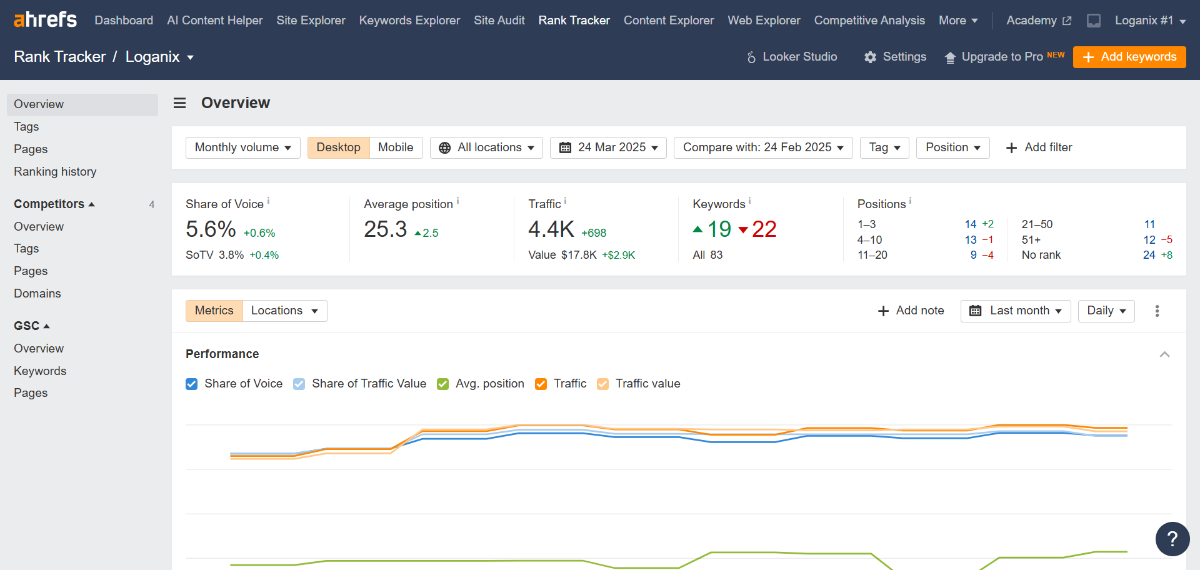
Scroll down the page a little lower to see the spikes or dips in hard numbers.
Conclusion and Next Steps
Pat yourself on the back; you made it! But the hard work doesn’t stop here. Highlighting the issues plaguing a site is one thing, fixing them is another.
That’s where Loganix steps in. Our SEO services take this audit game and drive results that stick.
👉 Hit our SEO services page, and let’s make it happen. 👈
Hand off the toughest tasks in SEO, PPC, and content without compromising quality
Explore ServicesWritten by Aaron Haynes on April 5, 2025
CEO and partner at Loganix, I believe in taking what you do best and sharing it with the world in the most transparent and powerful way possible. If I am not running the business, I am neck deep in client SEO.


